Tips and Tricks
» Posted on June 16 2009 in Tips
Hear are some of our favorites Tips and Tricks for Photoshop and other applications.
PC Shortcuts
- Select all - press Ctrl + A
- Copy selected - press Ctrl + C
- Paste - press Ctrl + V
- To open up the windows file manager window, press the Windows key and the “E” key at the same time. The Windows key is in the lower left corner between Ctrl and ALT
- Screen capture - Control Prt Sc, then open a new document in photoshop and press Ctrl V to paste the screen capture into the new document
- ALT + Tab to switch between open applications
- Task Manager - CTRL + ALT + Delete
Mac Shortcuts
- Select all - Cmd (apple) + A</li>
- Copy selected - Cmd + C</li>
- Paste - Cmd + V</li>
- Screen capture from selection you make - Cmd + Shift + 4 - then you will get a curser, draw a box around what you want to capture and upon releasing the mouse, a new .png file will appear on the desktop
- Pressing ESC while in Screen Capture Mode (see above) will cancel the screen capture
- Regular Screen Cap - Cmd+ Shift + 3
- While in the Finder, pressing Command N will bring up a new window
- Throw selected item in the trash - Option + Command + Delete
- Empty trash (while in Finder) - Shift + Command + Delete
- Command + Tab to switch between open applications
- Force quit - Cmd + Option + ESC
- Show Desktop - F11(OS 10.4)
Photoshop Shortcuts
- Open document - CTRL O (Mac Cmd O)
- New document - CTRL N (Mac Cmd N)
- Save - CTRL S (Mac Cmd S)
- Save As - Shift CTRL S (Mac Shift Cmd S)
- Close document - CTRL W (Mac Cmd W)
- Close program - CTRL Q (Mac Cmd Q)
- Show Rulers - CTRL R (Mac Cmd R)
- Reset foreground/background colors to default - D
- Switch foreground/background colors - X
- Fill selection with foreground color - ALT Backspace (Mac Option Delete)
- Fill selection with background color - CTRL Backspace (Mac Cmd Delete)
- Duplicate layer - CTRL J (Mac Cmd J)
- Merge selected layers - CTRL E (Mac Cmd E)
- Undo - CTRL Z (Mac Cmd Z)
- Undo by step - CTRL ALT Z (Mac Option Cmd Z)
- Preferences - CTRL K (Mac Cmd K)
- PC: CTRL [ or ] to move selected layer up one layer or down one layer
- Mac: Command [ or ] to move selected layer up one layer or down one layer
- Zoom in - CTRL + (Mac Cmd +)
- Zoom Out - CTRL - (Mac Cmd -)
Tip: Many menu items will display their respective keyboard shortcut to the right of them. Tip: Under Edit, then Keyboard Shortcuts, you can make your own keyboard shortcuts. Tip: Hovering over a tool in the toolbar with the mouse will reveal the keyboard shortcut for that tool.
*To make sure this happens, go to Preferences - CTRL + K (Mac Cmd + K), select Interface and make sure Show Tool Tips is checked.
Photoshop palettes:
- Layers F7
- Actions ALT + F9 (Mac Option + F9)
- Info F8
Common Photoshop adjustments:
- Levels CTRL + L (Mac Cmd + L)
- Curves - CTRL + M (Mac Cmd + M)
- Hue/Saturation - CTRL + U (Mac Cmd + U)
- Desaturate - Shift + CTRL + U (Mac Shift + Cmd + U)
Common Bridge shortcuts:
- Increase rating - CTRL and . (Mac Cmd and .)
- Decrease rating - CTRL and , (Mac Cmd and ,)
- Increase/decrease thumbanil size - CTRL and plus sign or CTRL and minus sign (Mac Cmd and plus sign or Cmd and minus sign)
- Move left or right one item - Left or Right arrow
- Zoom in with Loupe Tool - (+ and - keys) or jog wheel on mouse
Layer styles can be copied from layer to layer by holding ALT (Mac Option) and dragging the layer style to the destination layer.
Select an image’s layer by holding CTRL (Command on Mac) and clicking the image directly on the canvas. Select multiple layers by holding Shift and CTRL (Command on Mac) and clicking on the images (won’t work with auto-select layers on)
Use Smart guides to help with aligning objects. They appear as magenta lines by default. To change the color press CTRL K (Mac Cmd K) to bring up preferences, select Guides, Grid & Slices, and change the color under the smart guide pane.
Use Adjustment layers whenever possible. They will leave your original artwork untouched and can be trashed at any time.
Click and drag on an image while holding ALT (Mac Option) to drag out a copy. Hold Shift and ALT (Option) to drag out the copy in a straight line either horizontally or vertically.
You can change the Blend Mode of a layer without even clicking on the layer blend mode drop down menu. To do this, simply have the Move Tool selected and press Shift and Plus to scroll through the blend modes.
To view changes in the Histogram when making adjustments in Levels, you must have the histogram palette open and visible. The Levels histogram will not change to reflect your adjustments.
Pressing Shift along with the keyboard shortcut for any tool in the tool bar will cycle through each tool for that shortcut. For example: Pressing Shift J will cycle through the Spot Healing Brush, Healing Brush, Patch Tool and Red Eye Tool.
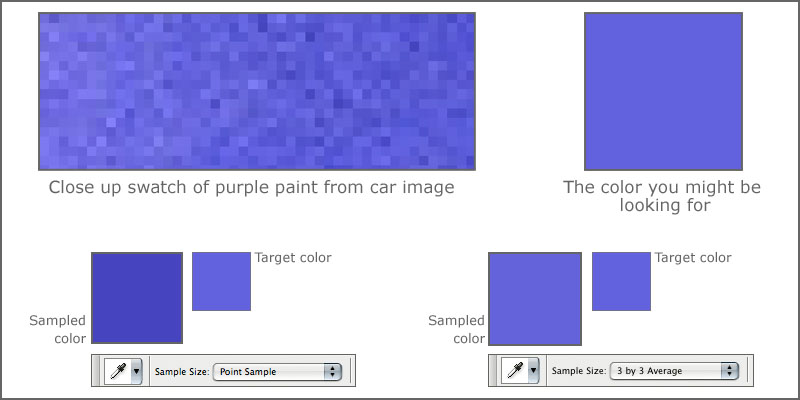
With the Eyedropper Tool selected, change the sample size to 3 x 3 average. You’ll get better color sampling results because the eyedropper will sample from a 3 pixel by 3 pixel radius. With point sample selected, the eyedropper will sample from whatever single pixel is selected. Since it may take a few different colored pixels to create a certain color, you want to make sure you are actually sampling the right color. (see below)
When making any kind of adjustment, it’s possible to reset the dialog should you need to start over. Simply press and hold ALT (PC) or Option(Mac), and the Cancel button will turn into a Reset button. (See below).
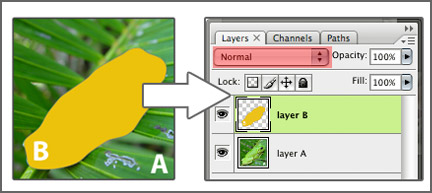
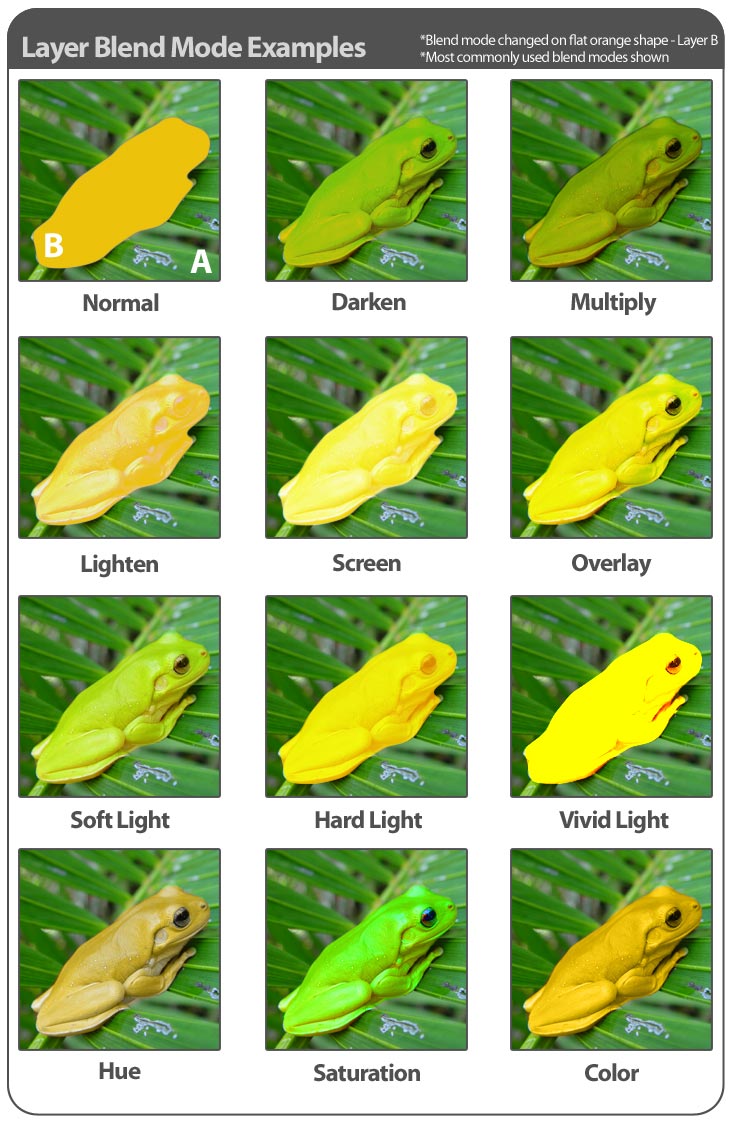
It’s always useful to have a visual when explaining something like the many different blend modes in Photoshop, so pictured below, we have some examples of various layer blend modes:
The flat, frog shape layer, B is shown here with the blend mode set to Normal. Normal shows the layer as is.
Examples of anti alias settings in Photoshop:
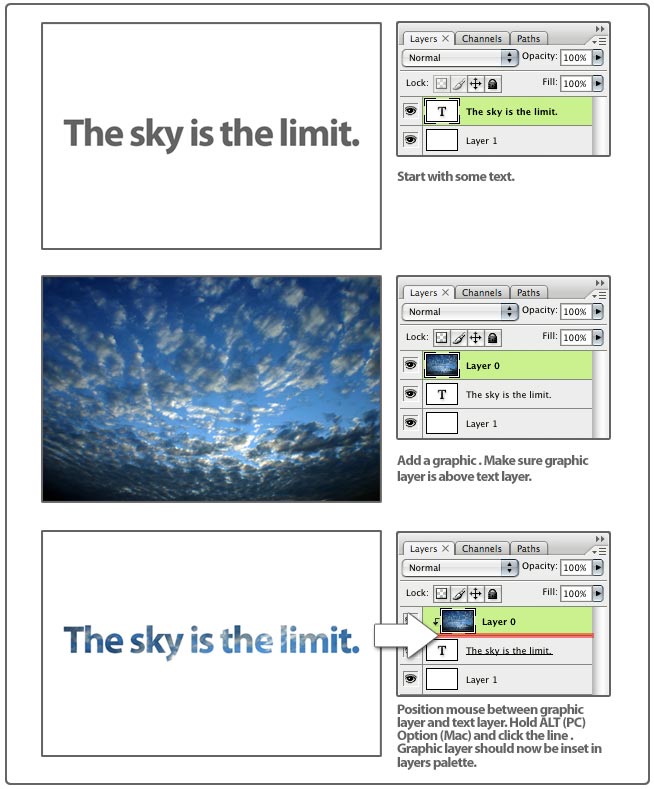
Fill text (or shapes) with a graphic with a clipping mask. Start with some text. Add a graphic on a new layer above the text. Position your cursor over the line between the graphic layer and the text layer. Press and hold ALT (PC) or Option (Mac), the cursor changes to clipping mask cursor, and click the line. The graphic is now only visible inside the text (works with shapes as well) and the thumbnail appears inset on the layers palette. (See below)
You can type on all sorts of crazy curved paths by simply creating a wokpath using the Pen Tool, and then using the type tool to place text on that path. Make sure you have Paths set (not shape layers).
When doing any kind of retouching, always work on a copy of the background layer and merge copied layers as you go. The fewer layers you have the smaller the file size will be.
When using the clone stamp or healing brushes, make sure to duplicate your background layer (original image) and work on the copy. Or work on a blank layer. With the clone stamp selected, turn on Sample All Layers to sample from the layer below.
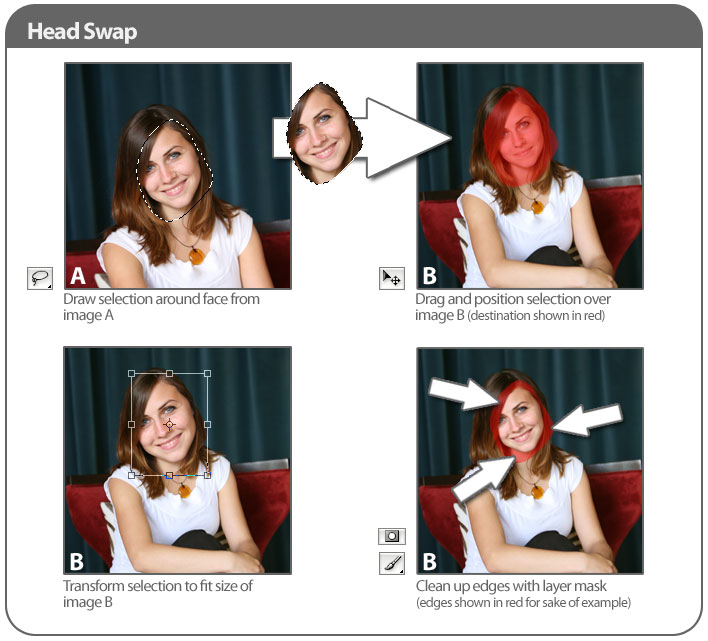
When doing a head swap, if the two images contain similar poses, it’s not neccessary to swap the entire head. You can usually get away with selecting just a portion of the face.
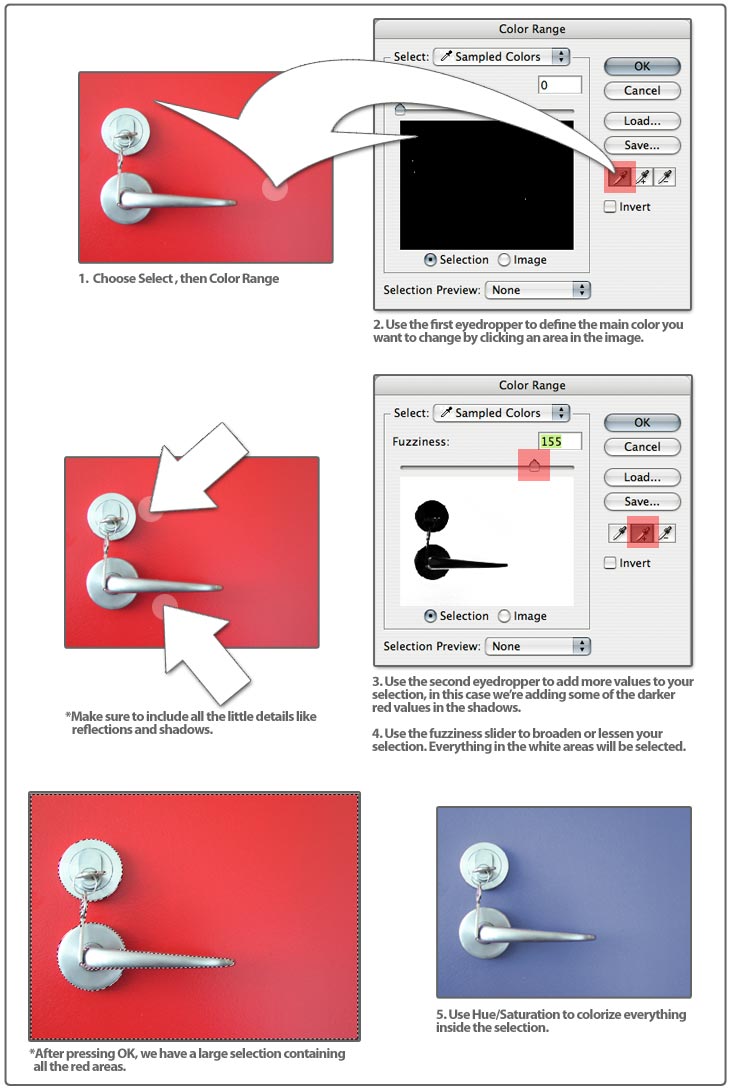
Use Color Range to select a colored object in an image that you want to change.
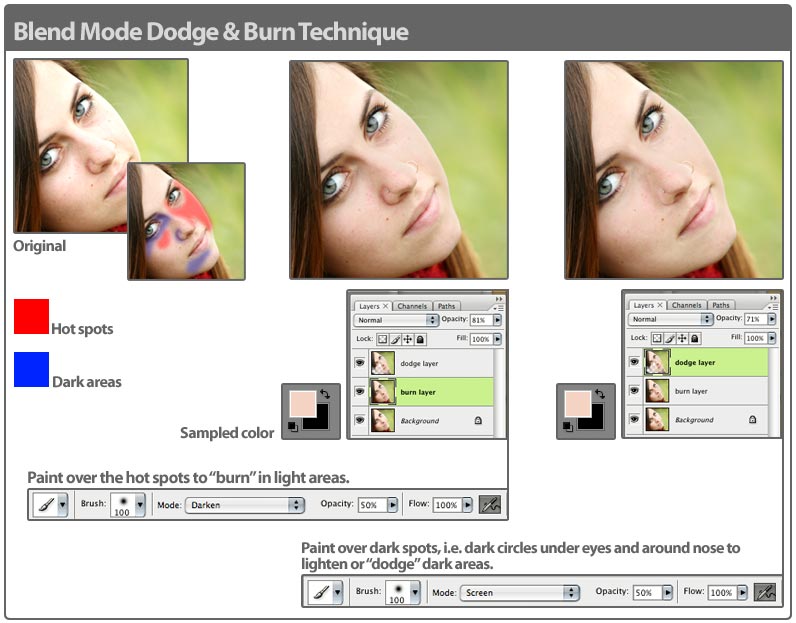
To use the brush tool as a burn and dodge tool, change the blend mode of the brush to darken or screen respectively. Duplicate the background layer. Name the new layer Burn Layer. With the brush set to darken and the opacity set to around 50, paint over the hot spot areas with a color sampled from a neutral section, in this case, a neutral skin tone. Lower the opacity of the new layer as needed. Duplicate the Burn Layer and name this new layer Dodge Layer. Now set the blend mode of the brush to screenand using the same sampled color, paint over the dark areas. Again, lower the opacity of the new layer as needed. Make sure you are using a soft round brush. (See below)